by Adnan HussainUVs are what tells your software how to wrap atexture on a 3D model. I'll go over a method to simply UV map amodel in a single piece as well as how to create a UV layout with multiple partscreated off a single model. In my case I used 3DS Max, but it should applyregardless of your animation software.You will need:a) A model to apply UVs.b) UV Master installed for ZBrush. If you don't see UV Master under the Zplugins menus in ZBrush, download and follow the installation instructions here:http://www.pixologic.com/zbrush/features/UV-Master/Multiple Piece UV Layout1. First prep your model. I created Mat IDs on a low res model and apply a multi sub object material to the model to retain groups in ZBrush. I kept the inside of the mouth seperate by assigning a unique Mat ID to it as well.2.Import into ZBrush as a Tool. (Check: Preferences Import/Export/ Import Mat as Groups to create groups) Groups will be displayed with different colors.3. In ZBrush create UVS from the Zplugin Menu with Zplugin/UV Master.Click on "Work on Clone" to create a copy of your model to work on.Settings as seen below: Refer to documentation for indepth info, but Symmetry keeps the UVS more symmetrical, polygroups, uses your polygroups if your model has them to cut it up. Enable Control Painting uses the Control Map you paint to help determine where to create seams.4. Click Protect then Paint Protected areas. Then click Attract to paint Attracted areas. Use Erase if you make any mistakes. After painting, save Ctrl Maps using SaveCtrlMap button.ctrl+shift+click on group to isolate a single group.ctrl+shift+click viewport bg to unhide groups.Red areas are Protected (discourage seam creation), Blue areas Attract (encourage seam creation).
 Unclick Protect/Attract/Erase and you can see the seams:
 Click Unwrap, then click Check Seams and adjust and redo as needed.Click Flatten to check the UV layout, then Unflatten to get back.
 If you chose to work on a copy of your model, you will need to copy the UVs from the copy to the original model in ZBrush.Click Copy UVs in UV Master. Load your Tool (original model) and thenclick Paste UVs.Export Obj file at lowest subdivision level.Import Obj into 3DS Max.File/Import/ObjChoose the Obj file exported from ZBrush.Using defaults + check two highlited options below.
 Apply UV Unwrap modifier to the incoming model.Use Cylindrical Mapping in UVW Unwrap on the mouth bag (inside of mouth), then scale and place it in the UV Editor on an empty spot in the UV Layout.Select all edges in edge mode in UV Unwrap Mode and weld edges with options set to weld threshold 0.001.Select Elements and pack as needed. Adjust Mat IDs. This approach has the advantage that you can resize pieces as needed for areas that require higher detail.Apply a tester map like this one:
 and check the UVs for stretching, flipping or other problems.
 Single Piece UV LayoutCreating a single piece involves a similar, but shorter process than creating multiple pieces. Import your model and use the following settings in UV Layout:
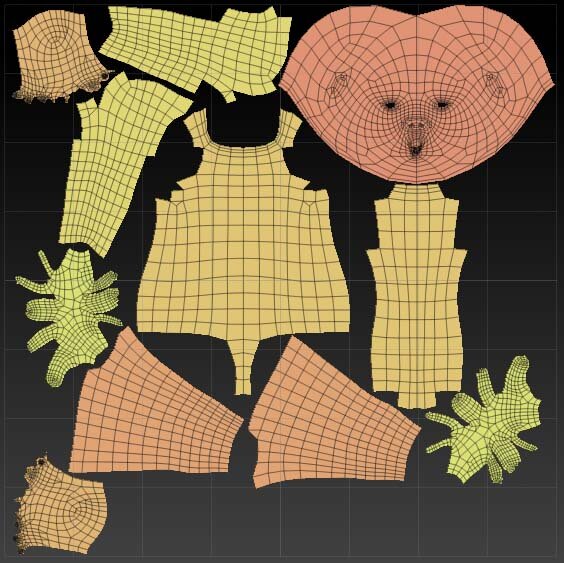
 I recommend quickly creating or loading a control painting to specify regions you don't want seams to appear. The main difference is how your UV Layout will look. Below is an example (Note, the shape in the upper right corner is the "mouth bag" UVed in 3DS Max after the fact).
 The rest of the steps for importing into 3DS Max are the same.Hope this was helpful!